How to Add a Border to a Photo Online
Add a white border or Polaroid-style frame in EditPic. Learn which styles preserve the entire photo and how to check the new image dimensions.
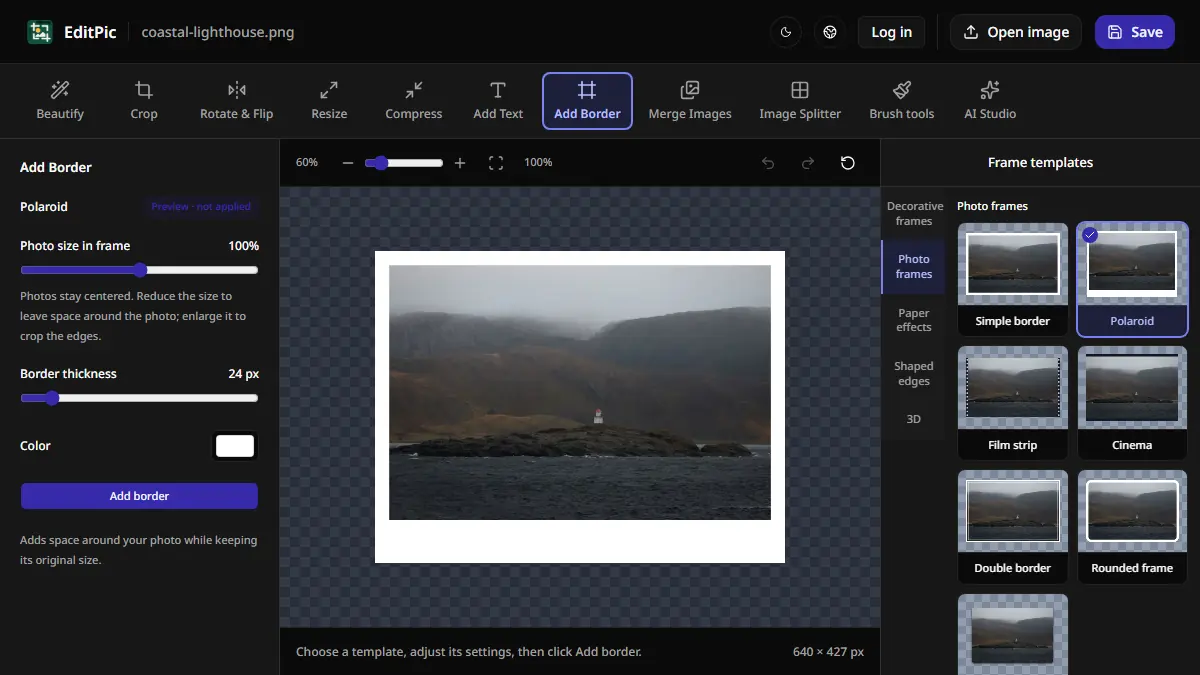
To add a border to a photo, open it in EditPic, choose Add Border, and pick a frame from Photo frames. Choose Polaroid if you want a white frame around the full photo, or Simple border if you want a line inside its existing edges. Adjust the thickness and color, choose Add border to apply the result, and select Save to download it.
How to add a white frame around the entire photo
- Open the Add Border tool and select Open image.
- Open Photo frames in the frame templates and choose Polaroid. On a phone, open the frame templates from the tool controls first.
- Adjust Border thickness. The template starts with white, and you can change the frame color in the settings. Keep Photo size in frame at 100% to retain the original framing, then review the spacing in the preview.
- Select Add border to apply the frame. Check the new dimensions in the editor, then select Save to download a copy.
In the screenshot, we framed a 640 × 427 px coastal lighthouse photo with a 24 px white Polaroid border. The saved file measured 688 × 523 px, and the original 640 × 427 px photo remained intact inside the frame. The template uses a deeper bottom margin, so the total height increases more than the width.
Which border style fits your goal?
- Simple border draws a line inside the edges of the photo and keeps the existing canvas size. Use a thin line if there is text or a subject near the edge. A thick line can cover some of that detail.
- Polaroid adds space around the image and leaves a deeper white margin at the bottom. It works when you want a framed print look or room below the photo for a short caption.
- Film strip adds space to the sides. Cinema adds space above and below. Check which direction can grow if the image will go into a row or a fixed-width layout.
- Shaped edges give the image a decorative outline. Some shapes trim part of the image edge, so inspect the corners for faces, lettering, or other details you need to retain.
For a light-colored photo, a white edge can blend into the page where it will appear. A dark border or a different background behind the framed image can make the perimeter easier to see. If you are framing a set of images, check the photos together at the size people will see them and adjust the border so it looks consistent across the set.
To caption a Polaroid-style frame, apply the border first and then add text. Place the title or date in the deeper bottom margin, where a short caption can sit without covering the photo. Check that there is enough white space below the lettering in the exported image.
How a border affects your upload dimensions
A frame that adds canvas area changes the pixel dimensions and can also change the aspect ratio. If an upload asks for an exact size, apply the frame first and check the new width and height. You can then resize the framed image proportionally when the framed photo already matches the required ratio.
If an upload requires a different shape, decide how much of the margin and photo you can trim before resizing. You may get a better result by cropping the original before adding the frame. Keep extra room around anything close to the edges and verify the final frame in the downloaded copy.
How to keep rounded or decorative corners transparent
Use PNG when you want the outside of a shaped frame to stay transparent. If the current save format is JPEG, use Compress after applying the frame and select PNG as the output format. Download that copy and open it over a contrasting background to check the corners. An opaque white frame also works in JPEG when the white is part of the design.
If you are framing a photo for a set, check one export before applying the same treatment to the others. Open the EditPic Add Border tool, pick a frame, and review the edges at the size you plan to share.
More Posts
How to Compress an Image Online Without Resizing It
Reduce a photo’s file size in EditPic while keeping its pixel dimensions. Compare JPEG, WebP, and PNG and check the result against an upload limit.

How to Combine Two Photos Side by Side Online
Put two pictures side by side in EditPic, control the gap and borders, and save a single image. See how to stack photos or make a larger collage.
How to Add Text to a Photo Online
Add a caption, label, or title to an image in EditPic. Choose a font and color, drag the text into position, and save the finished photo.